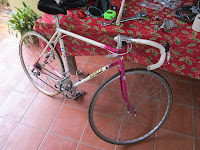
Update: (Nearly) finished bike
 +
+
= +
+
A $40 and a $30 bike put together to make a solid bike worth more than the sum of its parts ($70). And plenty of spares for the next one!
Build Log.
Weekend project #91231 fix up a old vintage bicycle for my girlfriend to make her uni commute a little easier.
Surfing eBay for a while I came upon, bidded and won this 10 speed Reighliegh bike for $39.
Of course, the advert said that this bike was suitable for people over 170cms tall. I thought my girlfiend was that tall. Turns out she isnt. not even close. She is only 160cms tall. I allways get my 60s and 70 mixed up! they sound so alike. When we got it homr she jumped on and had a little ride with a bit of difficulty. Even though we lower the seat fully she had trouble reaching the brakes and touching the ground without standing over the top tube and not in the saddle. I will have to configure the bike wherever possible to make it suitable to her height.
Step 1 - Stripping down the bike.

We pulled the bicycle completly apart seperating all the assemblies into small containers to keep the bits together. I threw out the old cables which were rusty and stiff.

We gave all parts a hit with the degreaser before a soapy bath to clean off all that mucky grease with bits of sand and grit suspended in it.

Overhauling the hubs. All the ball bearings were removed and the hubs were degreased. I plan to buy some replacement balls for the hubs. The balls we have are a little worn. I think they are relatively cheap. I called Allied BEarings that quoted around $5 for 100 1/4'' balls. I am going to buy a bunch so I can service other bikes in the future.
Here is a photo of the frame stripped down before repainting. I am sorry that I didnt take more photos.
Hear is the chain ring with the old pedals and some BMX green plastic pedals we can swap on. The newer green pedals weigh around a third of the old pedals!
The painted bike ready for reassembly forks, handlebars, and seat fitted. We used two coats of primer and 3-4 coats of silver top coat. I wish my girlfroiend had agreed to a different colour. The before and after photos wont be as impressive.
Note that we did a
chop and flip on the old drop bars to make bull horn handlebars (I think that was my influence working away). However, in this configuration my girlfriend was too bent over to reach the bars comfortable. So it became a chop flip and rotate. I like it!
Problem!!
With the newer sealed bearing (Shimano BR26) which replaced an old ball bearing bracket, because the bearing is much shorter, the chain ring is much closer to frame the inner ring hits agaist the chain stay.
Shit! What to do? I convinced my girlfriend that 5 gears will be enough for her (She doesn't ride very fast). We changed the small chain ring to the outside. This clears the chainstay, but restricts us to 5 speeds.
Another problem! the old pull brakes have much longer calipers than modern 50mm drop brakes (around 65mm). This means that new breaks dont reach the rim side wall where they are supposed to.
I tried a fork that I have from another bike. The forks aren't as long and the brake fits fine. Unfortunately the thread on the fork is not long enough so another modification is required. You can see in the photo below that the silver (original) for is about 15mm longer than the donated white fork.
So the options are as follows:
- Use the old pull brakes - I hate these because they are so fiddly. But with new shoes they should be reasonably effective.
- Buy new calilper brakes with longer drops - I was planning to buy new brakes anyway, but I wanted to get standard ones that I could share across other bikes.
- Use the white fork and cut the thread further - On the positive side, I get an excuse to buy more tools and learn a new skill, but I have to give up the forks from the other bike.
More later!


 +
+
 +
+

 We pulled the bicycle completly apart seperating all the assemblies into small containers to keep the bits together. I threw out the old cables which were rusty and stiff.
 We gave all parts a hit with the degreaser before a soapy bath to clean off all that mucky grease with bits of sand and grit suspended in it.
  Overhauling the hubs. All the ball bearings were removed and the hubs were degreased. I plan to buy some replacement balls for the hubs. The balls we have are a little worn. I think they are relatively cheap. I called Allied BEarings that quoted around $5 for 100 1/4'' balls. I am going to buy a bunch so I can service other bikes in the future.


